How To Disable Verizon Ringback Tones for use with Autopatch

Introduction
As amateurs, we are bound by Part 97.113 (Prohibited Transmissions) of the FCC's rules which states that you CANNOT transmit music using the Amateur Radio Service. Thanks to modern technology, this poses its own unique problems as many people use "Ringback Tones" to play music to callers instead of playing a traditional phone ringer. Since the transmission of this music over the repeater/autopatch system would be a violation of FCC rules and regs, we either can't call that person using the patch, OR we have to find a way to work around it.
Here is your workaround. This is a simple, step-by-step tutorial that demonstrates how to set up Verizon Wireless' "Ringback Tones" service using your web-enabled computer to exempt the CARC Autopatch's phone number so music isn't a problem.
It is important to note that this tutorial was not created by Verizon Wireless, nor is it endorsed by them. This is for your reference only. If you don't feel comfortable with this procedure, you should visit your local Verizon Wireless store or contact Verizon Wireless' Customer Service team and they will be happy to assist you. Use of this tutorial is "at your own risk", and may, under certain circumstances, subject you to additional charges on your bill. The steps here may change from time to time as upgrades/changes to the RBT system are implemented.
PLEASE READ THE IMPORTANT INFORMATION SECTION AT THE BOTTOM OF THIS PAGE
Step 1: Get Logged In

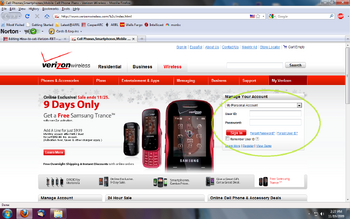
The first thing you need to do is open your web browser and surf over to "http://www.verizonwireless.com/" and wait for the page to load completely. Once the page is loaded, you will want to enter your account access credentials in the box indicated by the Green Oval in the photo to the left and click "Sign In."
If you do not have your account access credentials, you can attempt to register as a new user, or attempt to recover forgotten login information. This tutorial is NOT meant to teach you how to do set up access - I'm assuming you already know how to sign in to your online account management. If you need assistance, you'll need to visit the Verizon Wireless store of your choice.

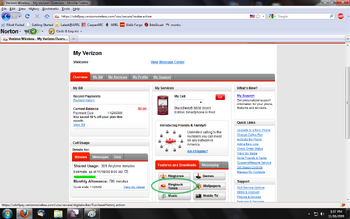
After you've logged in, you will see a screen that looks something like the image shown here. You will want to click on the button that reads "Ringback Tones" under the "Features and Downloads" heading. It's the button indicated by the Green Oval in the demo image at right. Then, wait for the following page to load completely before proceeding to the next step.
Step 3: Manage Your "Ringback Tones"

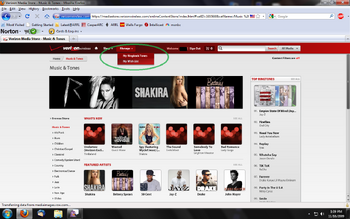
Once the new page has loaded, you will notice at the top that there is a drop down menu labeled "Manage" at the top of the page. Hover (don't click) your mouse cursor over this box and select "My Ringback Tones" from the drop-down. The Image to the left demonstrates what it ought to look like. Please wait for the next page to load completely before proceeding.
Step 4: Configure the Contact Info for the W7VNJ Repeater w/ Autopatch

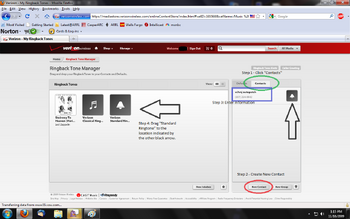
You should now see a page with two large boxes in the center of the screen. On the left side, your currently-active "Ringback Tones" are listed. To the right is a menu with two options tabs, showing "Defaults" and "Contacts."
There are four sub-steps to this procedure, so you'll want to proceed as follows:
- Sub-Step 1: Click on the "Contacts" tab above the right-hand box on the screen. This is demonstrated by the GREEN Oval in the picture at right.
- Sub-Step 2: Click on the "New Contact" button at the bottom of the right-hand box, as indicated by the RED Oval.
- Sub-Step 3: You'll need to enter a contact name and phone number as shown in the BLUE box in the demo image. The contact name shown here is for demo purposes only; you can name it anything you want. The phone number is most important, however. PLEASE BE SURE THE PHONE NUMBER YOU ENTER READS "(307) 234-9942."
Please note that the contact you're adding here DOES NOT need to be included in the contact list on your handset. You can add it if you want to, so you'll know if you're getting a call from the autopatch, but it's not necessary for this to work.
- Sub-Step 4: Finally, you'll need to "drag" the "Verizon Standard Ringtone" from the LEFT side of the screen and "drop" it on top of the contact you've added for the repeater. The BLACK arrows in the demo image show what this should look like.
That's All, Folks!
If you've followed this procedure, you can sign out of the session or close your browser window and your changes will save. Now your phone won't cause problems to someone trying to complete a patched call to your Verizon Wireless mobile phone.
It would be a good idea for you to test your number (or contact someone and ask them to help you test it) before you "rely" on it. Procedures for making a call using the autopatch are on the Area Repeaters page. Please remember to IMMEDIATELY terminate the patch if you hear music or hear the greeting "Please enjoy the music while your party is reached."
IMPORTANT INFORMATION
There are a few points to note here:
- The webpages shown here are subject to change at any time. These are representative of actual pages as of November 2009.
- If you don't already use Verizon's "Ringback Tones" service, completing this procedure MAY SUBJECT YOU TO ADDITIONAL CHARGES ON YOUR BILL. IF YOU'RE NOT SURE, CHECK WITH VERIZON'S CUSTOMER SERVICE TEAM OR VISIT YOUR LOCAL VERIZON WIRELESS STORE. WE CANNOT AND WILL NOT BE LIABLE FOR CHARGES INCURRED AS A RESULT OF YOUR FOLLOWING THESE INSTRUCTIONS.
- Some Verizon Wireless handsets allow you to make these changes directly from your handset, without having to use the web service. Since these procedures are unique to each handset, you'll want to check with Verizon's Customer Service team or your local Verizon Wireless store and they'll be able to talk you through it.
- It would be a good idea for you to share this procedure with folks that you're likely to call using the patch during an emergency situation. Of course, it's assumed that you'll first try to use your cell phone, since an autopatch should NEVER be your primary communications tool. This doesn't mean that EVERYONE needs to do this; your spouse, children and/or parent(s) should be enough.
- This procedure is complete to the best of our knowledge, but may not meet every need. If in doubt, please contact Verizon Wireless Customer Service or visit a Verizon Wireless store for assistance.
- THIS INFORMATION/TUTORIAL IS BEING PROVIDED AS A CONVENIENCE ONLY - BY NO MEANS ARE WE REPRESENTING OURSELVES AS EXPERTS OR AUTHORIZED INFORMATION OUTLETS FOR VERIZON WIRELESS. USE OF THIS INFORMATION IS AT YOUR OWN RISK AND WE EXPRESSLY DISCLAIM ANY LIABILITIES ARISING FROM THE USE HEREOF. WE DO NOT COLLECT, NOR HAVE WE COLLECTED MONIES, GOODS OR SERVICES IN CONSIDERATION OF PROVIDING THIS TUTORIAL/INFORMATION. ALL IMAGES, LOGOS, BRANDS, LIKENESSES AND OTHER INTELLECTUAL PROPERTIES REPRESENTED IN THE PHOTOGRAPHS ARE AND REMAIN THE REGISTERED TRADEMARKS AND/OR SERVICE MARKS OF THEIR RESPECTIVE OWNERS.